

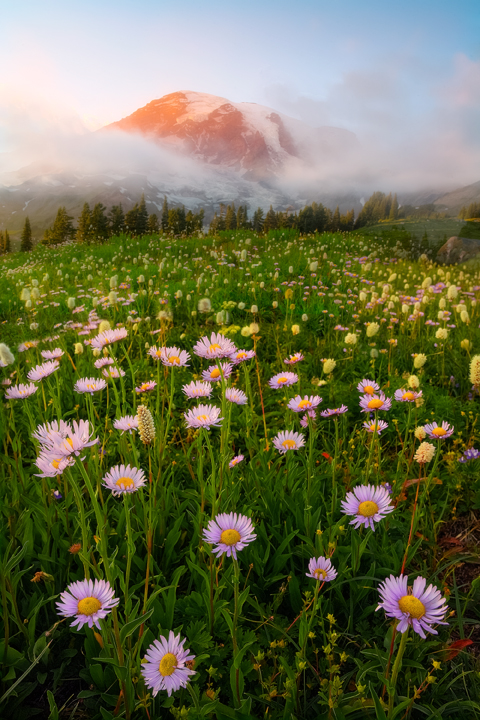
Johnston Ridge Observatory Region and meadows of wildflowers
Mt St Helens just had its 37th anniversary this week since its eruption on May 18, 1980. There are several different places to photograph wildflowers on Mount St Helens, which offer completely different views of the mountain, and wildflowers. Depending on time and area, wildflowers generally start to bloom in early July and make their way to different parts of the park throughout the month. Access to the different locations of Mount St Helens for wildflowers can be cumbersome and difficult at times. Make sure to bring a map and research routes to get to your destination. To find out more information about when the flowers are blooming I often call the visitor center at the Johnston Ridge Observatory to get up to date reports of the wildflower status. Depending on which direction you come from will determine which highway you take to get to the flower destination. What is unique about Mount St Helens is that each side offers a different perspective of the landscape. As mentioned, flowers bloom at different times depending on the elevation and which side of the mountain. In this article, I have listed some of my favorite areas and hiking trails to visit on Mt St Helens for wildflowers. I have also included at the end of the article some tips I have found helpful when photographing at Mt St Helens.
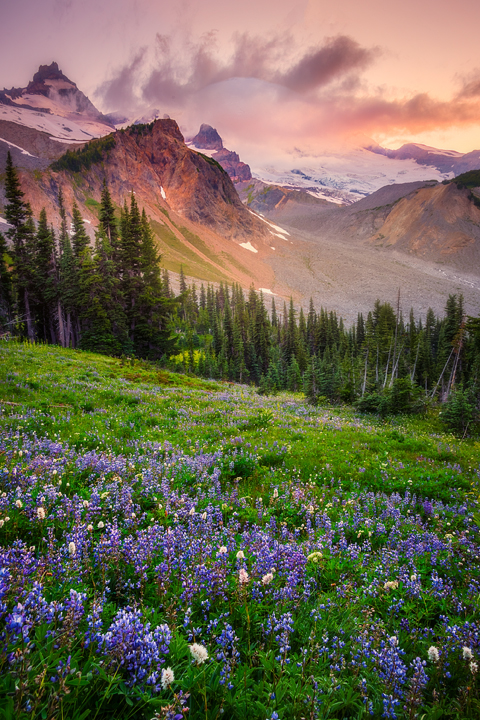
Johnston Ridge Observatory Viewpoint

Wildflowers in the valley below the Johnston Ridge Observatory area

Wildflowers and crepuscular rays around the pullout area around the Johnston Ridge Observatory
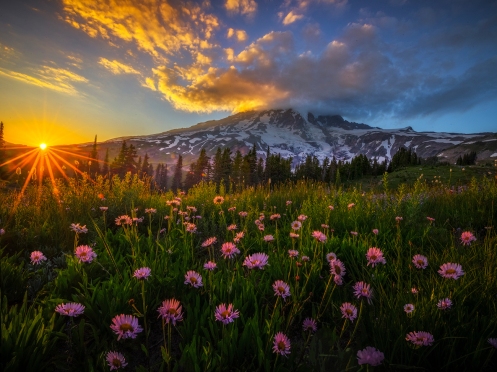
If you are looking to find the best flowers with the best view of the mountain, Johnston Ridge Observatory area will be your best bet. There are many trails and viewpoints from this area with the mountain and flowers together. In this particular area, the best flowers with the mountain are right in front of the visitor center. The collections of wildflowers that can be found are Indian paintbrush, penstemon, and lupine just to name a few. Make sure to explore around the area for at least a couple hours to find the best composition. I encourage people to hike the trails to find unique compositions. Because this spot is photographed often, I really try to get creative with my compositions.
Another great spot for finding huge layouts of flowers together is a pull out just before you reach the Johnson Ridge Observatory. What I like about this location is that you will find far fewer people, with a variety of different trails leading from the parking lot. With a multitude of different looks to the mountain with combinations of flowers.
Norway Pass

The Mysterious Sprit Lake at sunset from the top of Norway Pass Trail

Elements of fallen logs and wildflowers as part of the composition to lead the viewer into the mountain from Norway Pass Trail
The first trail I recommend for wildflowers and views of the mountain is the Norway Pass trail. It can be found on the eastern side of the mountain. Not only do you get wildflowers at the top of this hike but you can also look straight down at Spirit Lake. Throughout the hike, the scenery is stunning all around. What makes this trail unique is the juxtaposition between the old and new when you reach the top. You will see evidence of the devastation in terms of the landscape and the regrowth in the flowers together. Another unique fact about the Norway pass trail is the bear grass that grows up on the top, which complements the background view of Spirit Lake and Mount Saint Helens. My tip for this trail is to stay after the sunset and capture the reflection of the twilight colors in the lake, which provides a soothing mood and unforgettable experience.
Windy Ridge
The Windy Ridge trail will give you a completely different look of Mount St Helens. It is the closest you can get to the crater in terms of distance. The landscape is much different here than anywhere else on the mountain. I find it more barren. The combination of finding a set of wildflowers and the barren landscape together with the view of the mountain really tell a story. When I visit this area, my only goal is to find a solitary set of wildflowers surrounded by the stark landscape. From the Windy Ridge area, you have total access to the iconic surrounding mountains such as Mount Adams and Mount Rainier. Make sure to explore and take the different trails. To access the Windy Ridge you need to take the National Forest Road 99.
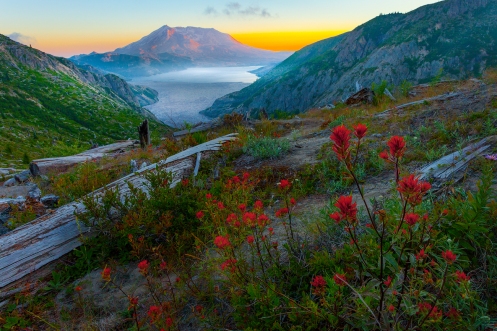
Lahar Valley Viewpoint

Lupine Explosion below Mt St Helens from the Lahar Valley Viewpoint
One of the most underrated viewpoints of Mount Saint Helens is the Lahar Viewpoint. The Lahar Viewpoint offers views from the Southside of the volcano. The area often has the most wildflowers of anywhere on the mountain as the valley is carpeted with penstemon, lupine, and other wildflowers. When photographing in this area, I will use elements of the landscape to use in my composition. I often look for logs that are placed on the ground that point towards the mountain. When this is immersed with flowers it makes for a very impactful photo. Hiking around the Lahar Valley, you will often find solitude. Of the many times I visited, I have been alone. I have walked several miles from the main trailhead, all with great views in the spring of the flowers and the mountain.
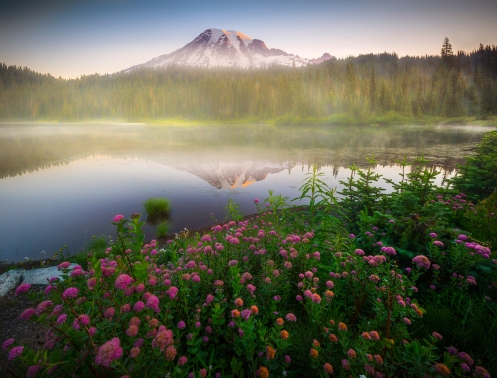
Coldwater Lake Loop
One of the areas I like to visit in the late afternoon if I have some time to relax is around the Coldwater Lake area. It’s not necessarily a great place for flowers but it’s a great place to walk around and get some exercise. If you get lucky you can capture the lake when it’s calm for the perfect reflection of the mountain.
Tips For Photographing The Wildflowers At Mt St Helens
There are many elements of the landscape that make Mt St Helens unique. Items such as fallen logs, crevices, and deep valleys are part of the landscape that really helps tell a story about the mountain and its history. Try to include these elements, to enhance the image and give a sense of place.

Using the elements of broken tree stumps to frame the valley of Mt St Helens and the mist in the valley
The variety of wildflowers and colors are amazing. A number of different colors is one of the first things that you will notice if you visit in July, besides the mountain. When photographing this amazing display of wildflowers it’s important to compose the image so the colors are balanced throughout. To be more specific, try to balance the warmer and cooler tones together so that not one side becomes heavier than the other in terms of color. I also try to get an even display of different flowers without one kind being too overwhelming. Because the colors have so much impact it’s important to be very mindful of how you compose these flowers in your image. It’s also important that the flowers lead into the mountain to create depth in your image as well as create a connection between the front of the image to the back of it. You will find at Mount St. Helens it will often be very windy, making it important to have a tripod. Make sure that you use a higher ISO and shutter speed to capture the detail in the flowers without movement. I will often photograph a series of different exposures at different ISO and shutter speeds. Making sure that I have an ample amount of images with wildflowers where there is detail and no movement.

ISO And Shutter Speed Fast Enough to Freeze the wildflowers and avoid the wind movement
One of my favorite things to do at Mount St. Helens’ is to photograph the wildflowers at night with the Milky Way. The combination of photographing the Milky Way and wildflowers together has become very popular in the last few years. It is certainly a challenge to photograph both the wildflowers at night and the Milky Way but the reward can be fantastic.
These are just a few of the areas and trails that make Mt St Helens a fantastic place to see and photograph wildflowers. Take the time this summer to really explore this mountain. You will not regret it!

Panorama view of Mt St Helens on the way up to Johnston Ridge Observatory


Recent Comments